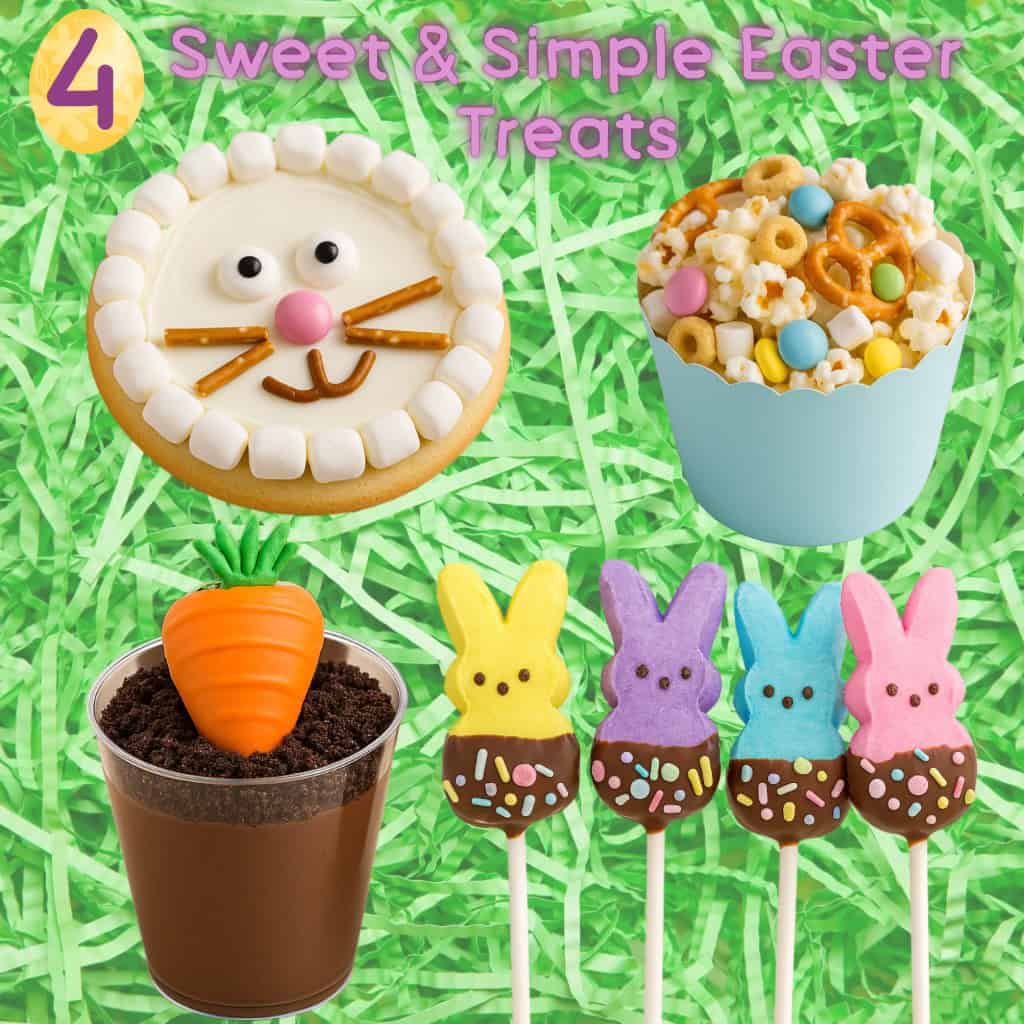
4 Sweet & Easy Easter Treats Kids Will Love to Make (With Your Help!)
4 Easy Easter Treats Kids Will Love to Make With You
There’s something special about baking with your kids, especially during Easter. The kitchen fills with laughter, sticky hands, and bright faces eager to help. These moments aren’t just about sweet treats—they’re about learning, playing, and building confidence.
Each of the four recipes you’ll find here is simple and joy-filled. Little hands can roll, dip, decorate, and taste along the way. You’ll both get to practice important skills, from pinching sprinkles to following simple steps. Sensory play takes center stage, and with a little guidance, kids will see just how creative they can be.
Safety matters most—keep watch when using melted chocolate or small candies. With the right supervision, every step can be safe and fun!
Ready to make memories? Here is a set for four Easter treats that are quick to make, full of color, and sure to bring out smiles!
Why Easter Treats Are Perfect for Baking With Kids
Easter brings so many chances to get creative with your kids in the kitchen. Whipping up sweet treats at home isn’t just about enjoying a sugary treats together—it’s about sharing time, teaching skills, and making lasting memories that last long after the last crumb is gone. Baking Easter goodies combines fun, learning, and a bit of healthy mess, all while giving your little helpers a real confidence boost.
Boosting Fine Motor Skills
Little hands become busy hands when baking. Scooping flour, rolling dough, sprinkling coconut “grass,” or lining up mini eggs all work those tiny muscles. When kids stir, pinch, squeeze, and decorate, they practice the movements their hands need for writing, cutting, and tying shoes later on. Here are some kitchen tasks that flex fine motor skills:
- Rolling dough into balls
- Placing candies or decorations carefully
- Spreading icing with a small spatula or butter knife
- Sprinkling toppings with fingertips
These moments aren’t just about how they look—you’re helping your child build up muscles needed for so many everyday skills.
Learning to Follow Instructions
Baking together weaves lessons about following steps in the right order. Kids get to listen, watch, and do. Each ingredient added, every instruction followed, teaches them patience and the payoff of working together. Recipes become gentle guides, showing how small steps create something wonderful in the end.
The kitchen is also a safe place to practice using numbers and new words—noticing measurements, setting timers, and even reading simple instructions along with you.
Sensory Play, the Sweet Way
There’s nothing like the feel of cool butter, the softness of flour, or the crunch of sprinkles under little fingers. Baking is a natural way for kids to explore with their senses—touch, smell, sight, and taste come alive. Every recipe gives them a chance to notice new textures and colors, listen to the bubbling of chocolate, and smell goodies baking in the oven.
Sensory play helps kids make sense of the world. And with Easter treats, it’s an activity that ends with something delicious to share.
Building Confidence Through Creativity
Seeing a treat come together from scratch is a big deal for kids. Sure, sprinkles may go a little wild and icing might be a little lopsided, but that’s part of the fun. When children see their own Easter creations on the table, pride shines through.
Giving kids safe choices—like picking colors or deciding which decorations to use—makes baking personal. Praising their efforts builds self-esteem and shows them that trying new things is worth it, even if things get messy.
Baking together isn’t just about the snacks. It’s about smiles, connection, and forming new traditions your kids will always remember.
Tips for Parent Supervision & Safety
While these Easter treats are designed to be fun and simple for kids, safety should always come first—especially in the kitchen. Here are a few tips to keep things safe and stress-free:
1. Supervise Hot Ingredients
Always handle the melting of chocolate or candy melts yourself.
Keep hot bowls and melted ingredients out of reach until they are cool enough to safely use.
Use microwave-safe bowls with handles to avoid burns when removing them.
2. Watch for Choking Hazards
Many treats use small candies (like M&Ms, marshmallows, or chocolate chips). Always supervise young children closely during decorating and snacking.
Avoid giving hard or round candies to children under 4 years old unless crushed or replaced with larger, safe alternatives.
3. Help with Sharp or Delicate Tools
Cutting tools (for cookie dough or decorating) and fragile items like lollipop sticks should be handled or closely supervised by an adult.
Always use child-safe scissors or butter knives when possible.
4. Clean Hands = Happy Helpers
Before starting any baking or decorating, make sure hands are washed well.
Let children know which tools and ingredients are safe for them to use on their own—and which are for grown-up hands only.
5. Enjoy the Process, Not Just the Result
Let kids lead when it’s safe. The more freedom they have to create, the more confident and independent they’ll become—with your guidance along the way!
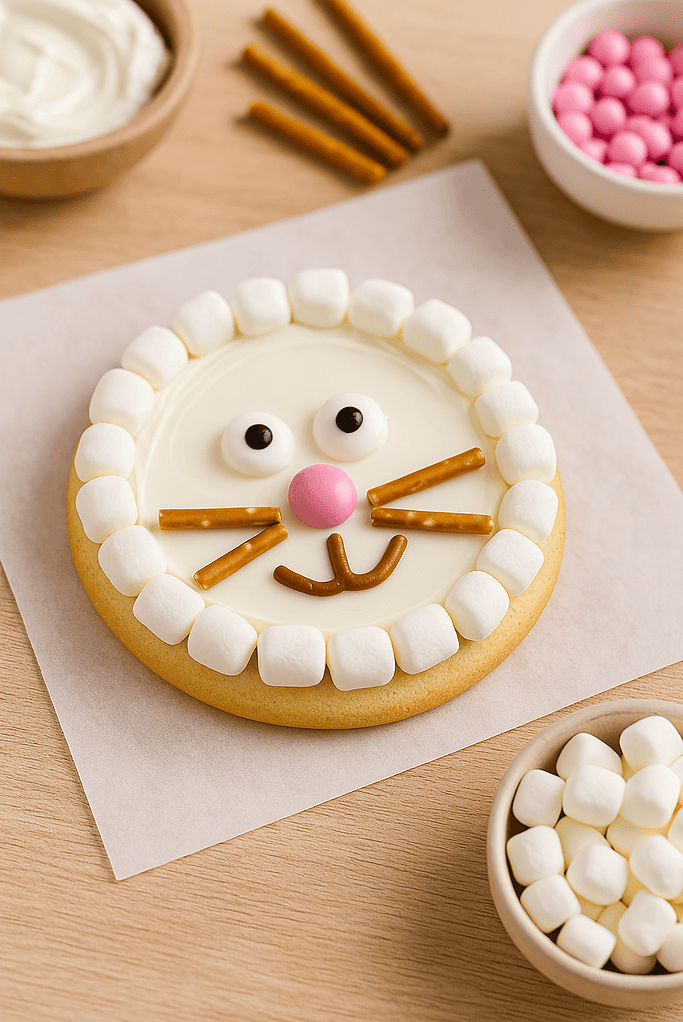
Bunny Face Cookies – Step-by-Step Instructions
These adorable cookies are almost too cute to eat! Kids will love decorating their own bunny face with frosting, marshmallows, candy, and creativity.
Bunny Face Cookies – Step-by-Step Instructions
What You’ll Need:
- Sugar cookie dough (store-bought or homemade)
- White frosting
- Mini marshmallows
- Pink candies (like M&Ms or Sixlets)
- Candy eyes or chocolate chips
- Pretzel sticks or licorice (cut into thin strips for whiskers)
Let’s Get Started!
Step 1: Prepare the Dough
Roll out your sugar cookie dough on a lightly floured surface to about ¼” thick. Use a round cookie cutter or the rim of a glass to cut out circles.
Place the cookie circles on a baking sheet lined with parchment paper.
Bake according to your recipe or package instructions.
Let cookies cool completely before decorating.
Step 3: Frost the Base
Using a spoon or small spatula, spread a thin layer of white frosting over the top of each cookie to create the bunny’s face.
Step 4: Add the Face Details
- Mini Marshmallows: Press marshmallows around the edge for a fluffy bunny “fur” outline.
- Pink Candy: Place one in the center as the bunny’s nose.
- Candy Eyes: Add two candy eyes or chocolate chips above the nose.
- Whiskers: Use pretzel sticks or licorice to create 3 whiskers on each side of the nose.
Step 5: Let Them Set
Let the cookies sit for a few minutes so the frosting firms up and holds everything in place.
Step 6: Enjoy & Share!
Time to admire your adorable bunny creations—then eat and share the fun!What You’ll Need:
Skill Boost: Fine motor control, shape recognition, and expressive creativity.

Chocolate-Dipped Peeps Pops – Step-by-Step Instructions
Let’s Get Dipping!
Step 1: Prep Your Workspace
Lay out a sheet of wax or parchment paper on a tray or counter for your Peeps to dry. Open up the sprinkles and have lollipop sticks or straws ready.
Step 2: Add the Sticks
Gently insert a lollipop stick or straw into the bottom of each Peep. Be careful not to push too far or split the Peep.
Step 3: Melt the Chocolate
Melt your chocolate in a microwave-safe bowl, stirring every 15–30 seconds until smooth. Use separate bowls for different colors if you want variety!
Step 4: Dip the Peeps
Dip each Peep about halfway into the melted chocolate. Gently shake off any excess.
Step 5: Add the Sprinkles
While the chocolate is still wet, decorate with Easter sprinkles. Kids can create patterns or just sprinkle freely—there’s no wrong way!
Step 6: Let Them Set
Place dipped Peeps on the parchment paper and allow them to cool and harden completely (about 15–20 minutes at room temperature or a few minutes in the fridge).
Step 7: Display and Enjoy!
Serve in a cup or display as a bouquet—then eat and enjoy your sweet creations!
Skills Your Child Is Building: Hand-eye coordination, Pattern recognition, Creative confidence and following steps
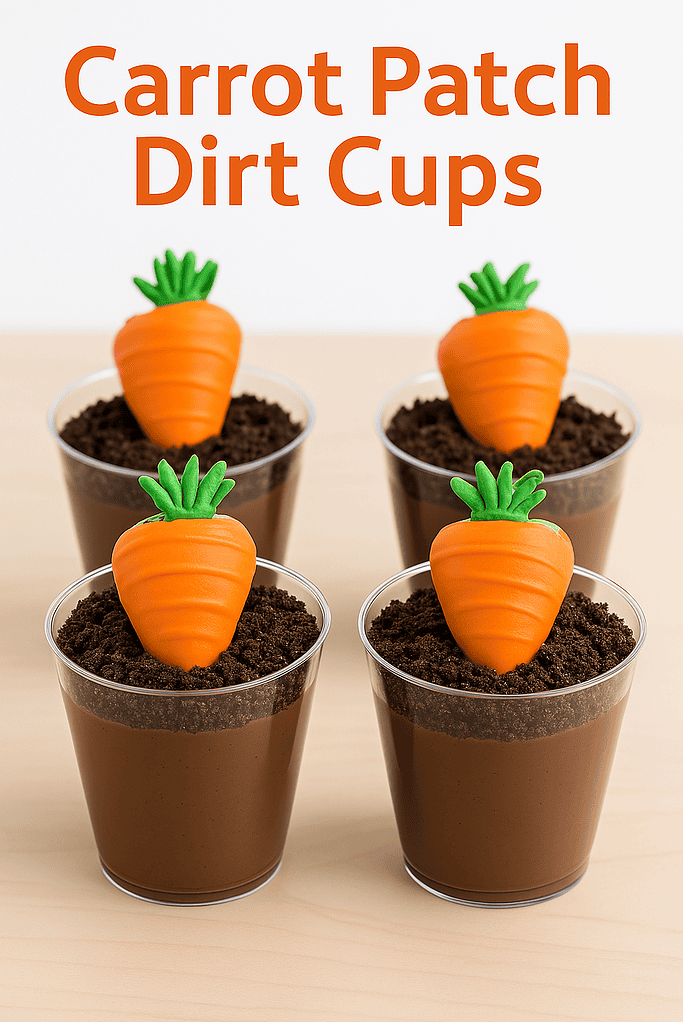
Carrot Patch Dirt Cups – Step-by-Step Instructions
What You’ll Need:
- Chocolate pudding (prepared and chilled)
- Crushed chocolate cookies (like Oreos, for “dirt”)
- Orange candy melts
- Fresh strawberries (washed and dried, with stems removed)
- Green icing or edible grass
Let’s Make It!
Step 1: Prep the Strawberries
Wash and dry your strawberries completely—any water can make the chocolate seize. Remove the green tops if you’d like a smoother look, or keep them for leafy “tops.”
Step 2: Melt the Orange Candy
In a microwave-safe bowl, melt the orange candy melts according to the package directions, stirring every 15–30 seconds until smooth.
Step 3: Dip the Strawberries
Hold each strawberry by the top and dip it into the orange chocolate, swirling to coat. Let the excess drip off, then place on parchment paper to harden.
Step 4: Build the Dirt Cups
Spoon chocolate pudding into small clear cups or bowls, filling about ¾ of the way.
Sprinkle crushed cookies on top to create the “dirt” layer.
Step 5: Plant the Carrots
Once the dipped strawberries are set, gently press one into the center of each dirt cup so it looks like a carrot growing out of the soil.
Step 6: Add Greenery
Use green icing or edible grass around the top of the strawberry for a leafy look.
Step 7: Chill & Serve
Refrigerate until ready to serve. Then grab a spoon and dig in!
These clever treats are not only delicious—they’re a visual hit! The “carrots” are actually strawberries, dipped in orange melts and “planted” in pudding and cookie crumb dirt.
Skills Your Child Is Building:
- Imaginative thinking (pretending and creating!)
- Sequencing (following multi-step directions)
- Sensory exploration (touching, tasting, layering textures)
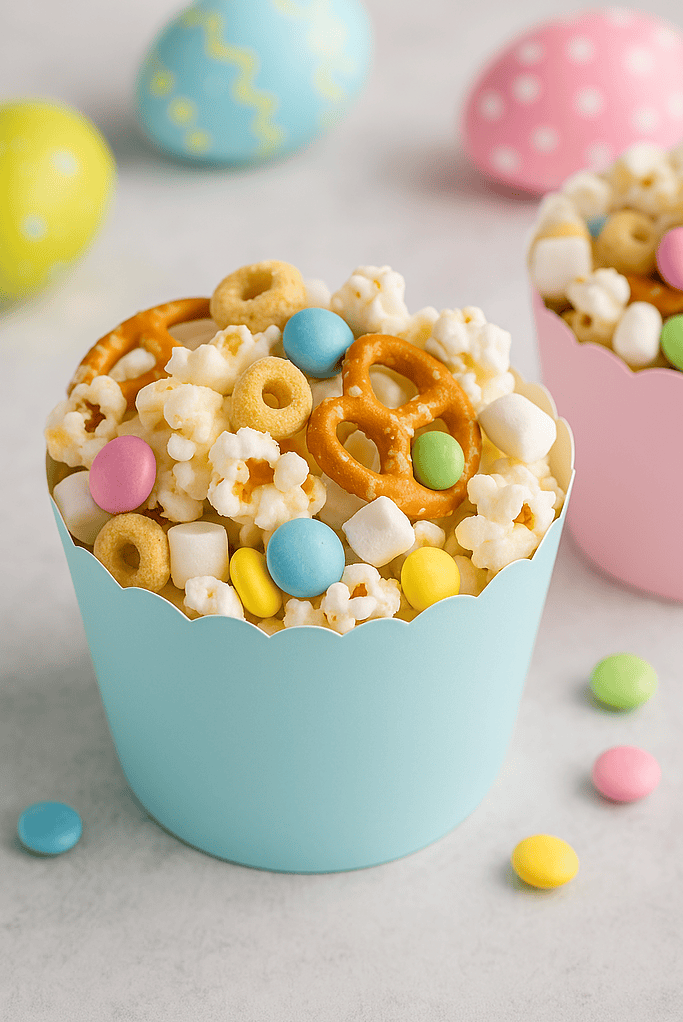
Easter Bunny Bait Snack Mix – Step-by-Step Instructions
What You’ll Need:
White chocolate (melted)
Popcorn (plain or lightly salted)
Mini pretzels
Cheerios or bunny graham crackers
Mini marshmallows
Spring-colored M&Ms or pastel chocolate candies
For the trail mix, use a mix of these:
- Mini pretzels
- Bunny-shaped graham crackers or animal crackers
- Easter-themed cereal (like pastel O’s or puffs)
- Mini marshmallows
- Dried fruit (such as golden raisins or small apricots, chopped)
- Chocolate eggs or candy-coated chocolates
- Yogurt-covered raisins or nuts (optional, but watch for allergies)
- Colored sprinkles or mini nonpareils (for extra fun)
- Candy eyeballs or mini bunny ear picks (for decorating)
Go with what your kids like or try new add-ins—this recipe is easy to change up for picky eaters or allergies.
Step-by-Step Instructions for Assembly: Explain the process in clear, easy-to-follow steps, pointing out which parts are perfect for little hands.
Kids love having their own “job” in the kitchen. Here’s how to make bunny trail mix cups together:
Learning Opportunities: Sensory Play and Creativity
Marshmallow chick pops pack a lot of learning into every step. Dipping, decorating, and pressing candies help kids practice careful movements and build coordination. Pinching a tiny eye or shaping a mini beak challenges fine motor skills in the best way.
Sensory play shines through—let kids feel the softness of marshmallows, the warm smoothness of melted chocolate, and the cool, grainy sprinkles. Sight gets a treat too—every pop boasts bright yellows and bold decorations, drawing attention to shape and pattern.
Most of all, chick pops are about letting kids try out ideas, make choices, and see their own designs come to life. Each child’s chick will be different, and that’s the best part. Whether your little one wants to make a whole nest of chicks or tries to match their favorite cartoon, they’ll get a boost in confidence and creativity.
Parents can praise the “messy” masterpieces—there are no rules for chick fashion during Easter! This simple project encourages self-expression, lets kids experiment with textures and colors, and always ends with a smile (and a tasty treat).
Gather Your Ingredients and Materials
Line up everything before you start. This step gives kids a quick preview and helps them feel ready to help. Here’s what to pull out:
Benefits for Fine Motor Skills
Tiny movements make a big difference here. Every step, from pouring cereal to molding eggs, gives kids a chance to work on important hand skills. Here’s how crispy rice eggs help develop fine motor abilities:
- Mixing and stirring: Turning the spoon works wrist and finger muscles, building strength and coordination.
- Scooping and pressing: Gathering sticky cereal and pushing it into shapes supports grip and control.
- Shaping by hand or with cutters: Squeezing and molding the mix builds the tiny muscles in hands and fingers, important for writing and buttoning clothes.
- Decorating with small candies and sprinkles: Placing decorations asks kids to use a gentle touch—pinching and setting items in just the right spot. This boosts hand-eye coordination.
- Drawing with icing pens: Squeezing a pen or tube takes planning and precise movement, building up fine control for future skills.
Kids gain more than a snack—they get real practice building up the skills they’ll use every day. Plus, they take home a treat that looks and tastes like victory.
Fruity crispy rice egg treats are sweet, chewy, and full of opportunity, letting kids explore, create, and show just what their hands can do.
Making Kitchen Time Fun, Safe, and Memorable
Getting kids in the kitchen turns ordinary moments into treasured memories. A little preparation goes a long way to keep things running smoothly. With a few easy systems and a focus on fun, you’ll keep everyone’s hands busy, smiles wide, and safety top-of-mind. Plus, you’ll set the stage for new family traditions that outlast any sugar rush.
Expert Tips for a Safe, Organized Kitchen
Start with a quick check of your workspace. Clean off counters and make space for bowls, tools, and little helpers. Lay out all ingredients before you begin. This makes it easy to spot what’s missing—and limits messes from kids searching the cabinets.
Keep sharp or hot items far out of reach. If you use a stovetop, oven, or melted chocolate, always have an adult handle those steps. For younger kids, use kid-friendly utensils (like plastic knives and small spatulas). Move stools or sturdy chairs close by so small children can see and reach without stretching or climbing.
Have a cleanup kit ready. Pep towels, extra wipes, and a big bowl for food scraps give busy hands a place to “help” as you go. At the end of each step, pause for a quick clean-up—this teaches kids responsibility and keeps counters sticky-free.
Some safety reminders work best posted on the fridge or taped on a cupboard:
- Always wash hands first and after touching raw eggs or sticky treats.
- Tuck long hair back and roll up sleeves.
- Never taste batter with raw eggs. Wait until treats are ready!
- Remind kids: “If you’re not sure, ask for help!”
Playful and Meaningful Baking Traditions
Family baking isn’t just about what comes out of the oven. It’s time together—no screens, no rush. Setting aside baking days helps everyone slow down and reconnect. You can turn simple activities into lasting rituals. Try these ideas to start a family baking tradition:
- Wear matching aprons or kid-decorated chef hats. Let kids personalize their own kitchen gear with fabric markers or iron-on patches.
- Play a favorite playlist or let kids pick the music. Baking dances are encouraged!
- Divide tasks like a cooking show: stirrers, decorators, supervisors, and official taste-testers.
- Take “before and after” pictures of your creations and display them on the fridge, or make a simple baking photo album.
- Start a holiday baking box—save your favorite cookie cutters, spatulas, and decorations in a special bin that only comes out on baking days.
- Let each child invite a friend or family member to bake their favorite treat next time—everyone brings new stories and memories.
These small touches help make baking feel special—not just another to-do. Over time, you’ll see how much these moments matter. Kids remember the giggles, mess-ups, and encouragement far longer than they’ll remember perfect cookies.
Learning, Laughter, and Lasting Memories
You don’t need fancy tools or Pinterest-worthy skills to make the kitchen a place where kids want to be. Simple recipes put fun front and center. Give kids real jobs—mixing, shaping, decorating. Praise effort, not just the outcome. Ask about their favorite part or share stories from when you learned to bake.
Encourage kids to taste new flavors or invent wild new treat combinations, even if it gets a little messy. Some of the best memories come when things don’t go exactly as planned.
When screens go off and hands get busy, you’ll see your kids light up. Each baking day is a chance for hugs, teamwork, and lots of laughter. It’s not just about sweet treats—and it never has been. It’s about building a warmth in your home that kids will carry with them long after the last jellybean is gone.
A Sweet Ending
Easter brings the perfect reason to slow down, gather in the kitchen, and let your kids take center stage. These easy treats aren’t just about sugar—they help build hands-on skills, spark creativity, and boost confidence with every colorful bite. Sharing these simple moments gives kids memories that last and a sense of pride in their own work.
If you try any of these recipes or put your own spin on them, I’d love to see what you create. Share your photos, tips, or family traditions in the comments. Thanks for making time for joy and play—you’re building something more than snacks: you’re growing memories, one sweet step at a time.